The M1083 6×6 constructed in 2017.
We manufacture electronics, that is true. We are also RC fanatics that enjoy building vehicles of all types. Last year we acquired a 3D printer and shortly after decided to put our skills to the test and build a 3D printed 1:10 6×6 military cargo truck. A few months and a couple spools of filament later, we had created something completely from scratch and spare Axial parts.
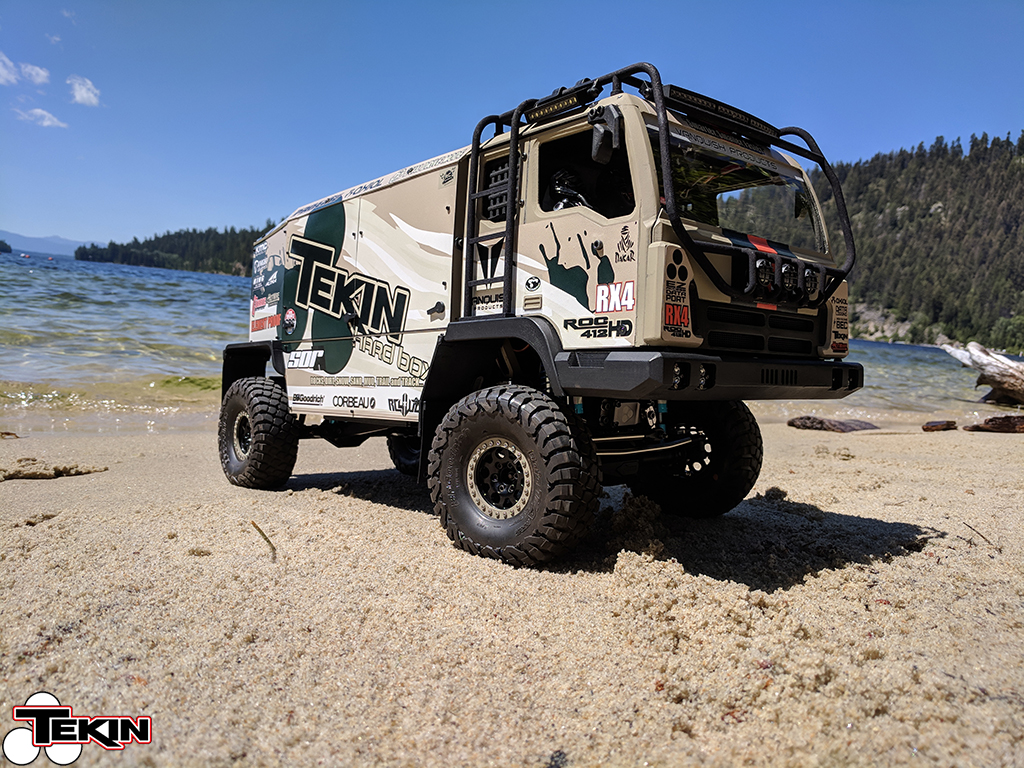
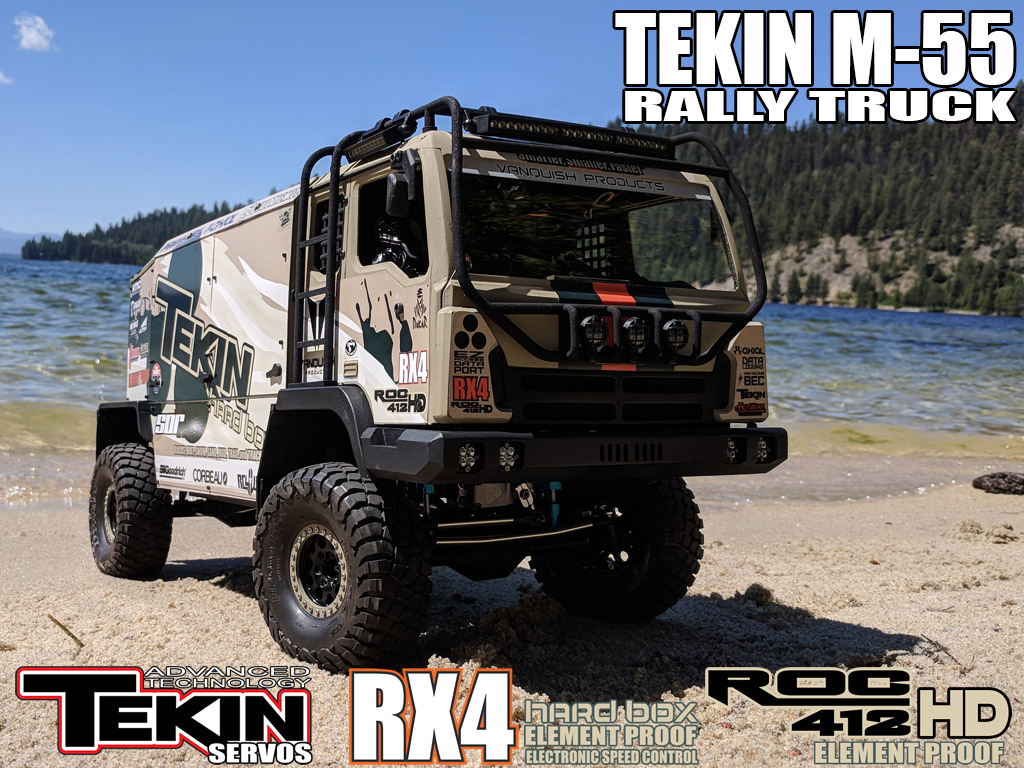
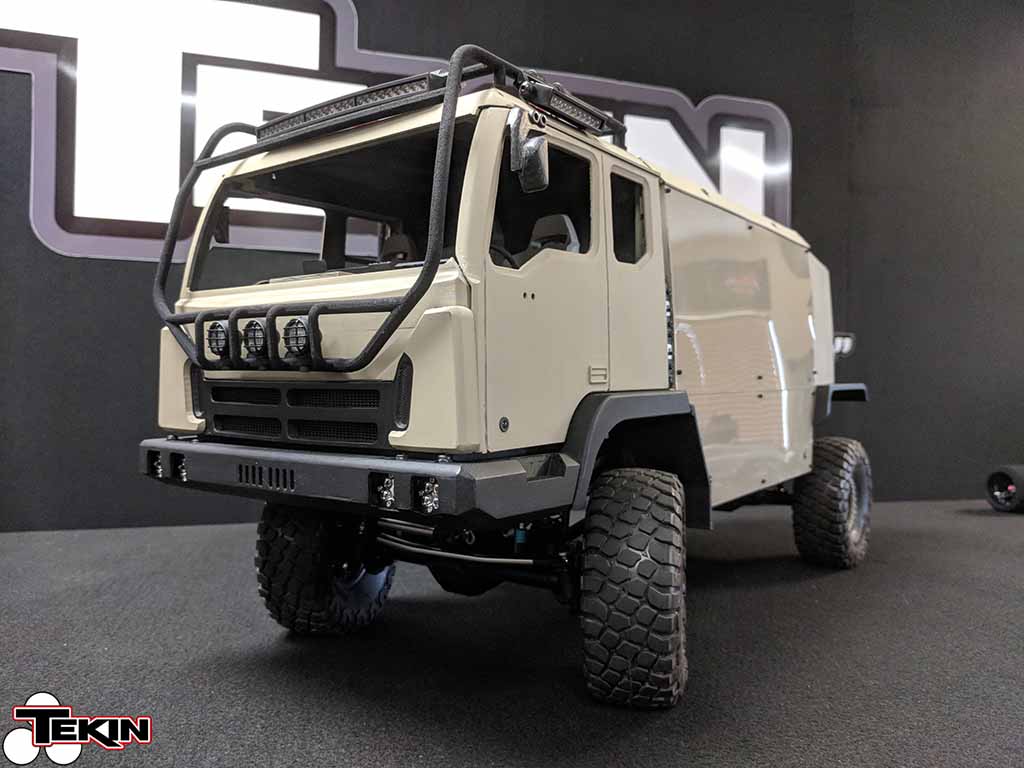
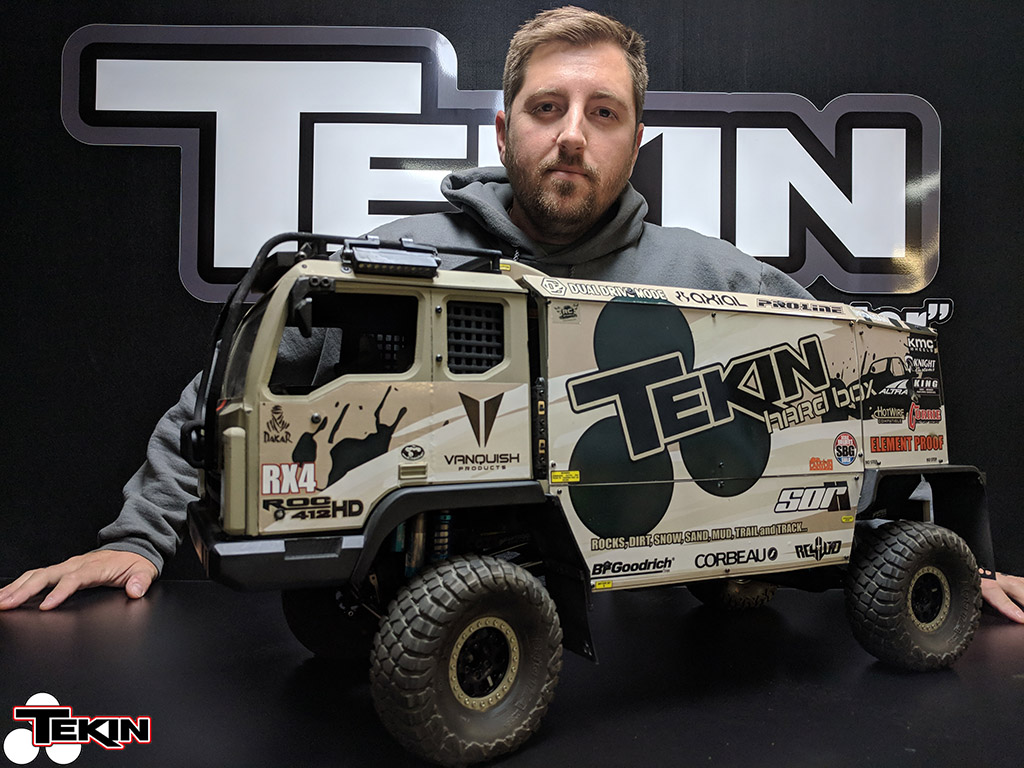
The project was fun, successful and satisfying to say the least and we took the vehicle to Axialfest 2017. While we were there, the Rebel Offroad Rebelzilla truck rolled in and camped down the aisle across from us. We drooled over it all week and it was already decided; the next build was going to be something similar. Inspiration came from both the Rebelzilla and Dakar rally trucks like the Red Bull Kamaz team and being that we like to do our own thing, we decided to modify the cab from the 6×6 to create a Race Spec version for the next build. Our cab is based on the Stewart & Stevenson (now owned by BAE Systems) design, which was originally the Steyr 12M18 and was modified to suit US Military needs. Our first big 3D printed build taught us a lot of dos and don’ts when it came to design, material, print process and assembly.
I have huge respect for all the companies that design kits, it’s no cakewalk making hundreds of parts fit together with the necessary hardware all while having proper suspension geometry to make it all work like it needs to. Assembling something from the ground up was fun and also a challenge. The M1083 6×6 paved the way for the new truck to take shape.
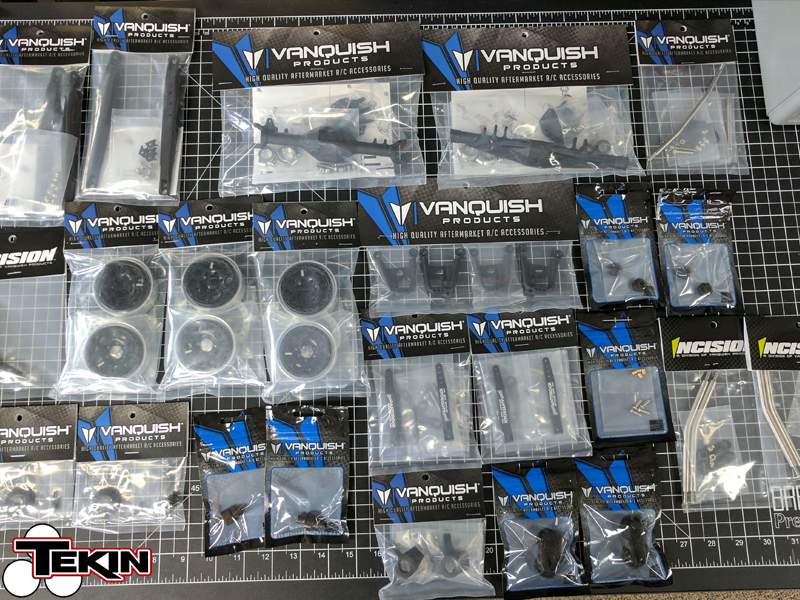
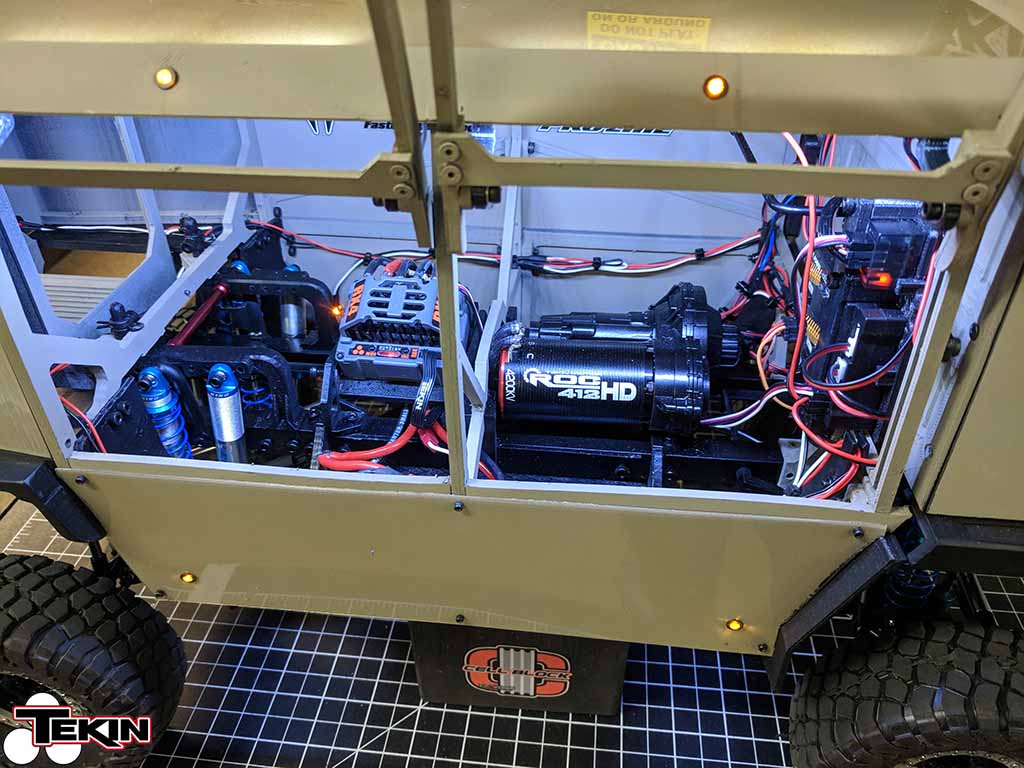
Once back from Axialfest 2017 I started rounding up a massive pile of parts from Vanquish Products, Axial, RC4WD and Pro-Line. I ordered fresh spools of ABS Filament from Makeshaper, bought a 4′ piece of 3/8″ aluminum c-channel to use as frame rails and set aside an RX4, 4200kV ROC412 HD and T-440 Servo to make the beast move. The actual parts list is quite extensive, a lot went into the build and it’s all top-quality components from some of the best companies in R/C.
Vanquish Currie F9 Front Axle – VPS07850
Vanquish Currie F9 Rear Axle – VPS07851
Vanquish SCX10-II Currie F9 Servo Mount – VPS07856
Vanquish SCX10-II Black Knuckles – VPS02900
Vanquish SCX10-II Rear Axle Shafts – VPS08082
Vanquish AR44 Axle Gear Set (2) – VPS08330
Vanquish 12mm Black Wheel Hex (2) – VPS07082
Vanquish SCX10-II Spool (2) – VPS08070
Vanquish Incision SCX10-II VDI Universals – IRC00180
Vanquish Incision Stainless SCX10-II Tie Rod
Vanquish Incision Stainless SCX10-II Drag Link
Vanquish Bomber Trailing Arms Black (2) – VPS07350
Vanquish Incision Stainless Bomber Upper Link (2) – IRC00051
Vanquish 1.9 KMC Enduro Wheel Pair (3) – VPS06941
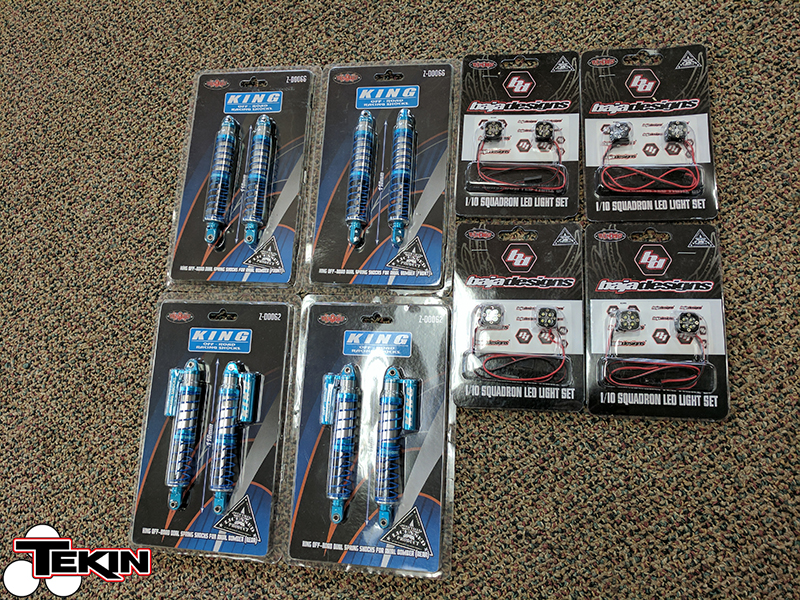
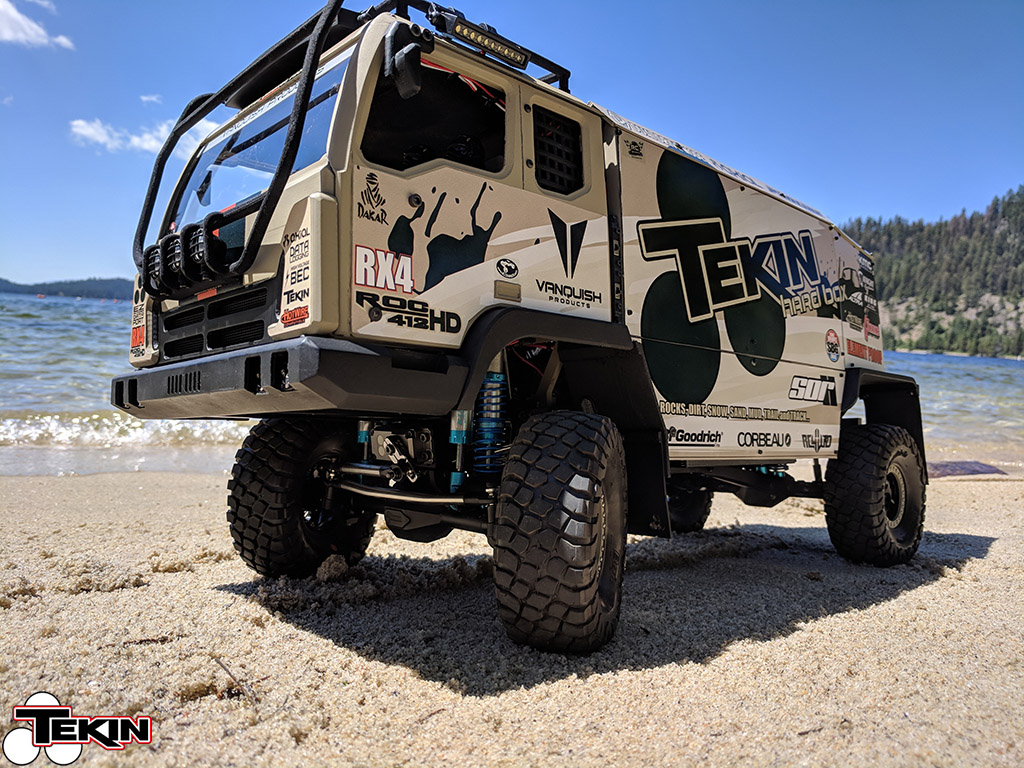
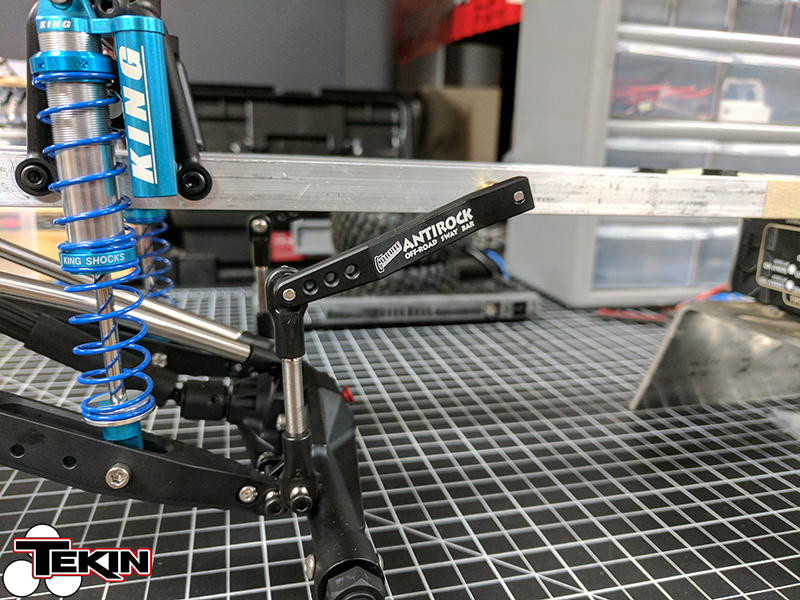
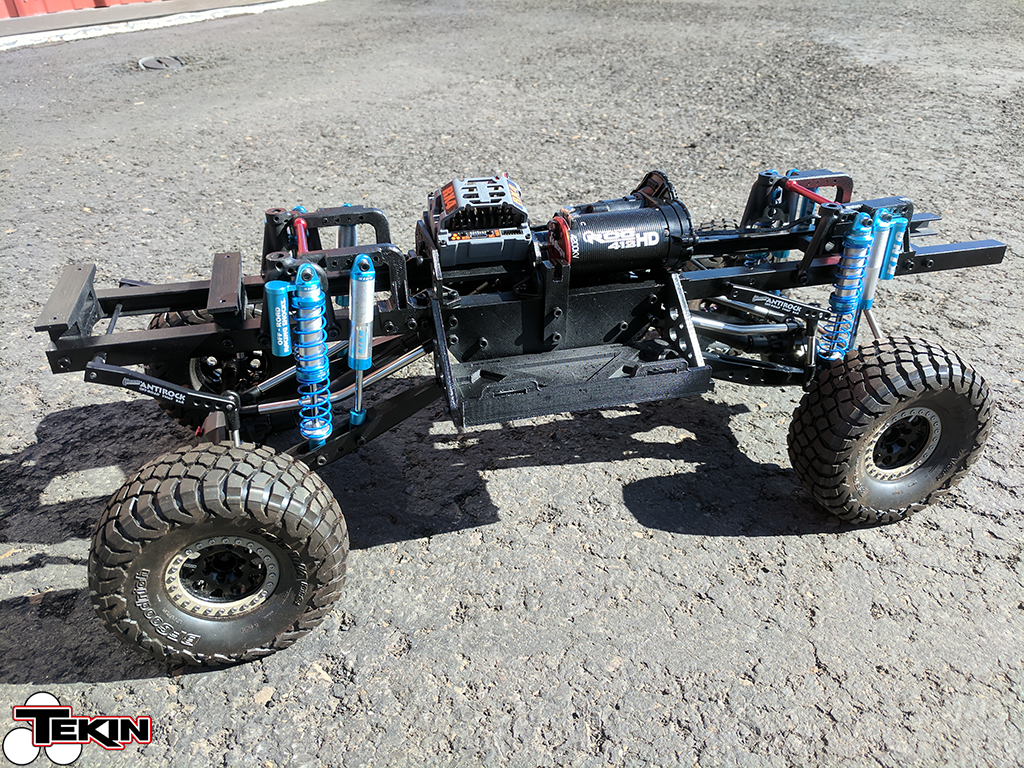
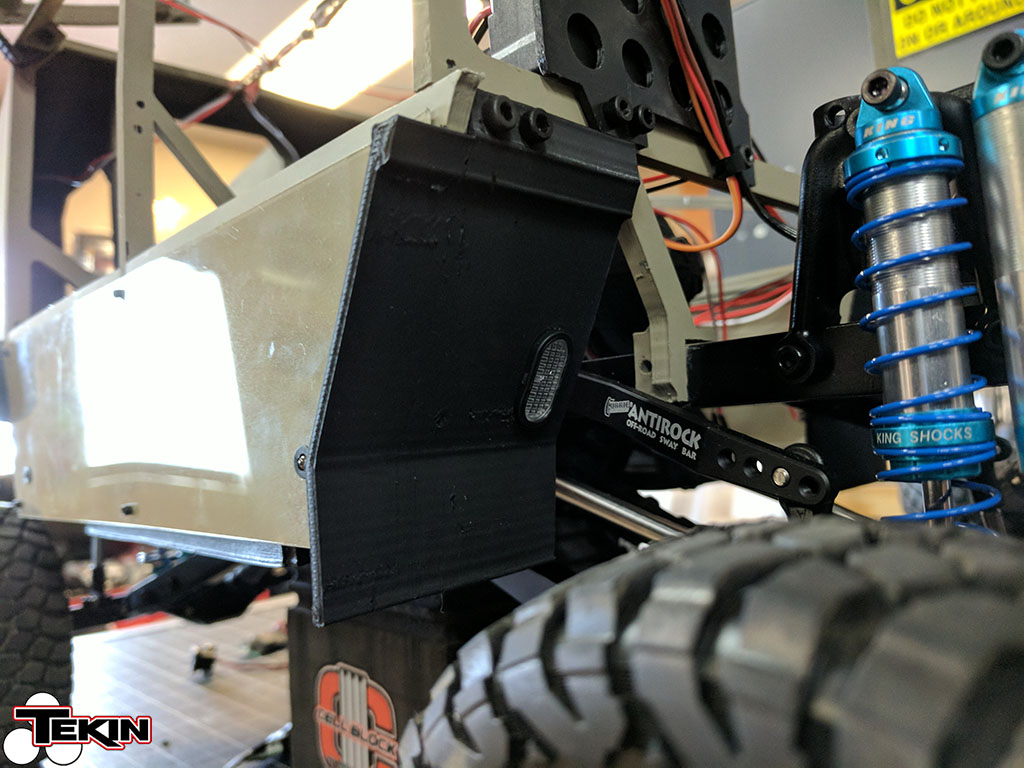
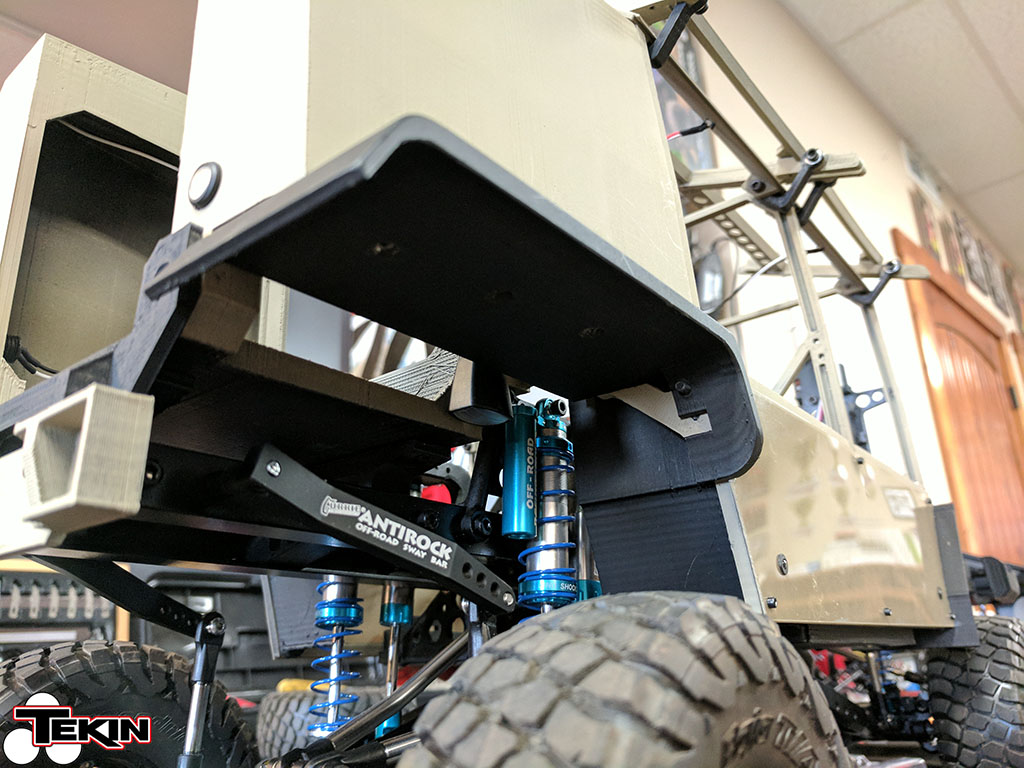
King Shocks from RC4WD we chosen to hold the truck up and with some work we made 2 fit on each corner. One would act as the coil-over and the second would act as a damper to help absorb impacts and keep the truck stable on rough terrain. It looks great and performs even better than I thought it actually would. I filled each shock with 40wt oil and messed around with the dual rate spring setup on the coil overs a bit and I ended up using all the softer springs on both the front and rear to get the truck to sag the right amount and sit at a proper looking ride height.
RC4WD Bomber King Shocks 110mm Pair (4) – Z-D0030
RC4wD Baja Designs Squadron Pod Pair (2) – Z-E0066
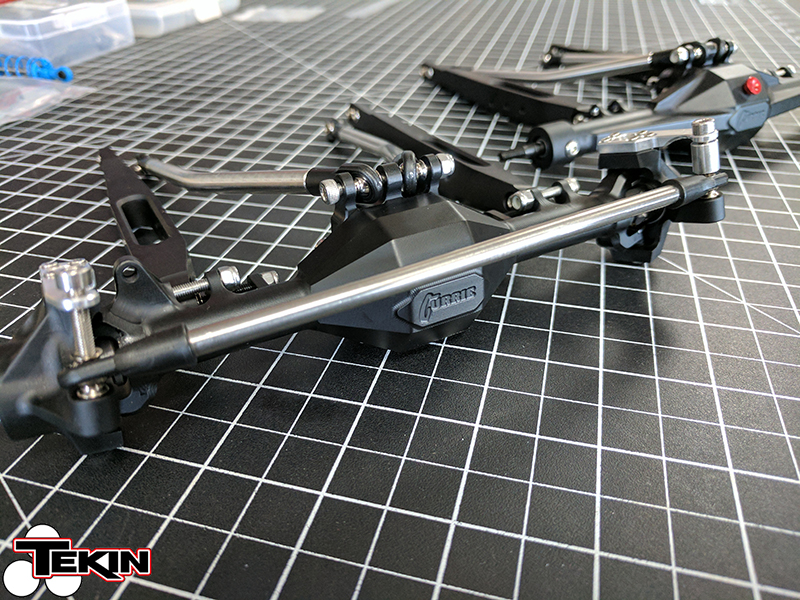

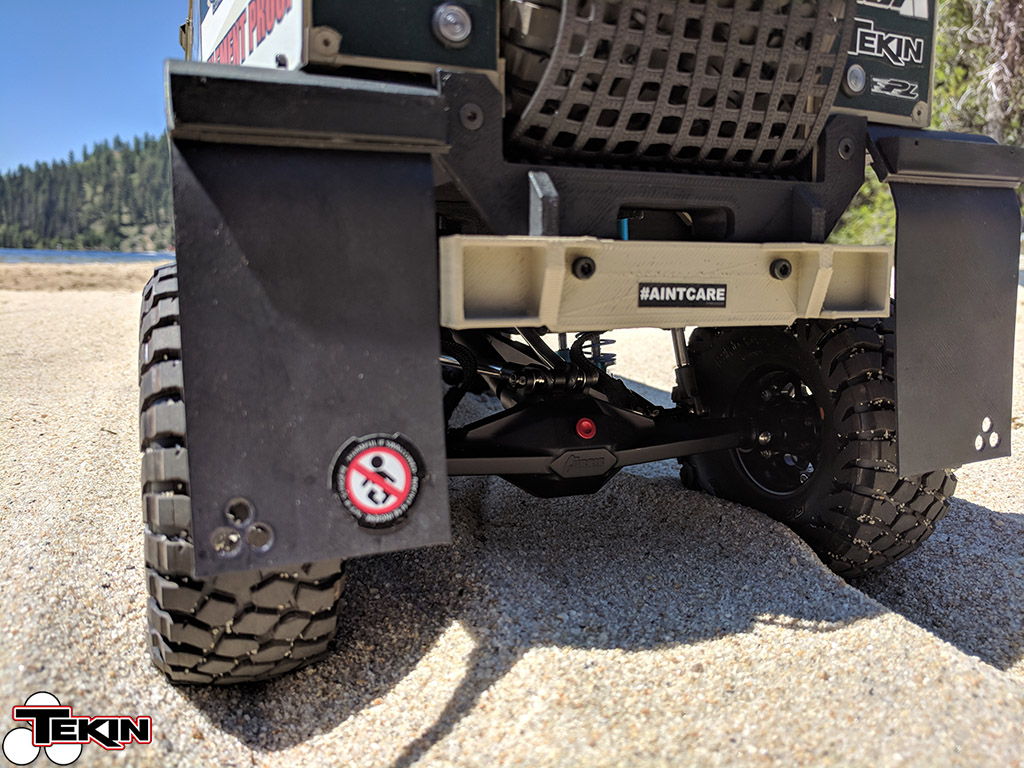
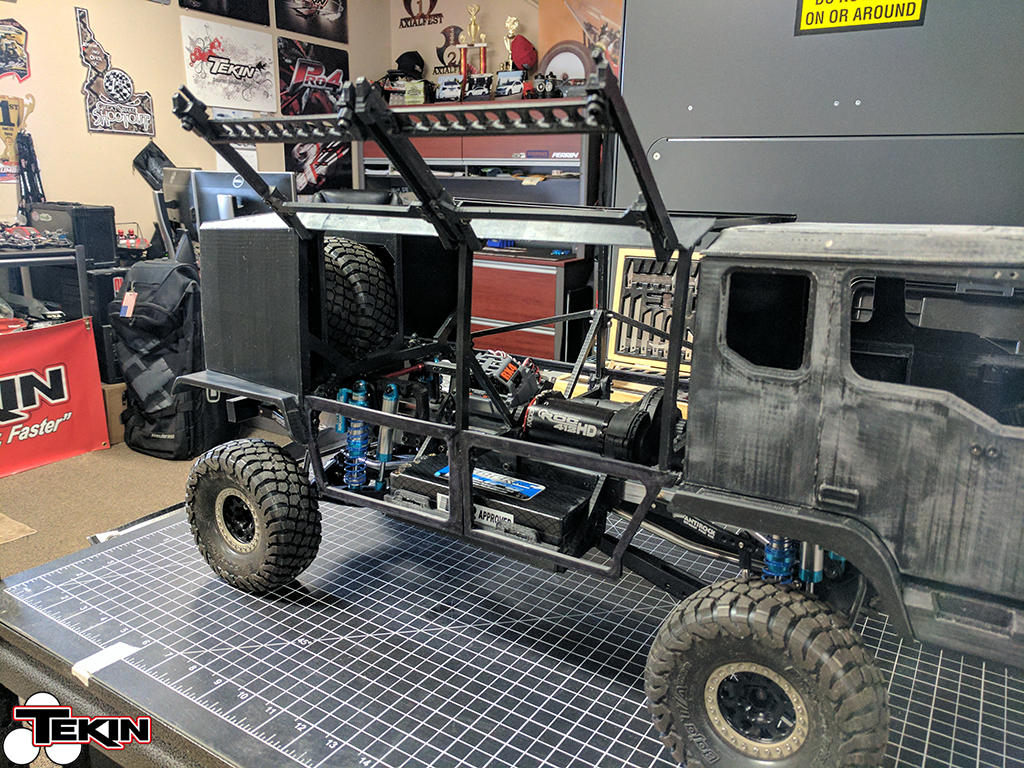
Before even starting on the frame, I decided to assemble the axles. I decided to go with Currie F9 Axle housings from Vanquish and complete them with all Vanquish and Incision parts. These billet works of art are a joy to assemble, look amazing when assembled and back up their great looks with performance. Having weight down low on a big truck that goes way too fast for its size is always welcome. Incision 1/4″ Stainless links were used for the upper links, tie rod and drag link. The axle upper links are Bomber rears and Bomber Trailing Arms were used as the lower links on both the front and rear axles. The suspension is symmetrical front to back, with the only difference being the shock mounting positions. The rear are trailing arm mounted, the front are mounted on the axle. Mostly this was done for aesthetics and a big truck like this deserves to have some beefy lower suspension arms hanging onto the axles. It ended up working very well in the end.
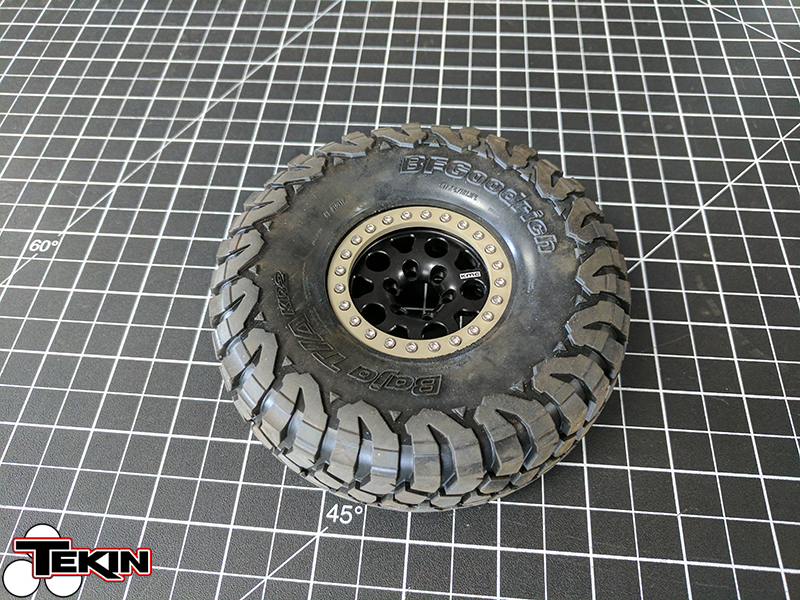
Wheels and tires can make or break a build. After using Pro-Line BFGoodrich Baja KM2 tires on the 6×6 build and being happy with both performance and appearance, I chose to use them again on the M-55. I stuffed Pro-Line closed cell foams in them and mounted them on Vanquish KMC Enduro 1.9 bead lock wheels and paint matched the outer ring to the base color of the truck. Closed cell foams are a must in a vehicle that ends up weigh 14lbs. I also didn’t want the tire folding over when trying to turn and the foams are definitely do their job!
Proline Racing 1.9 BFG Baja T/A Pair (3) – PRO10118-14
Proline Racing 1.9 Closed Cell Foams Pair (3) – PRO6173-00
Vanquish 1.9 KMC Enduro Wheel Pair (3) – VPS06941
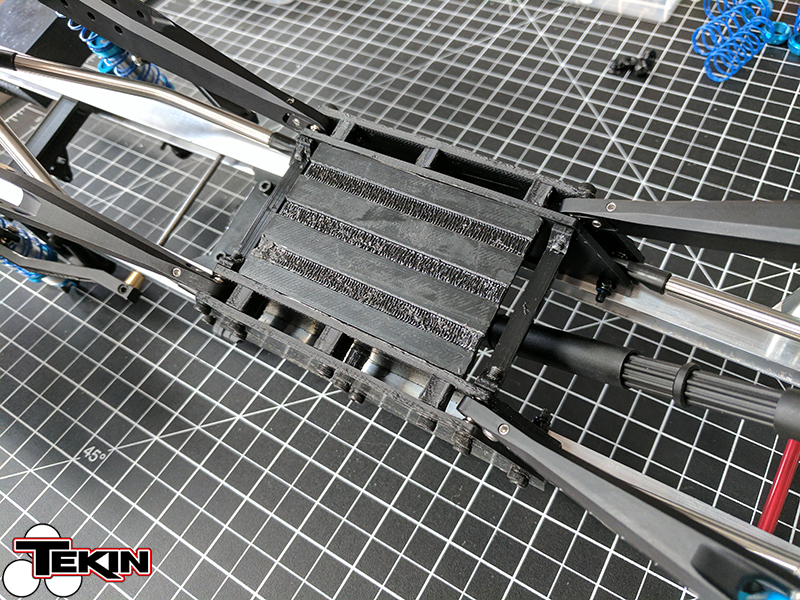
 One of the biggest challenges of the entire build was the center skid area. We wanted to maintain Axial Bomber geometry (or as close as we could, anyway) for a few reasons; first since we chose to use Bomber-specific upper links and trailing arm lower links it was important to get the mount positions accurate to keep the axles clocked properly and prevent any binding in the suspension and second we had to get our wheelbase as close to 390mm as possible. Why? Well we based this off the M1079 LMTV and we wanted to keep it 1:10 scale. Mock-up parts were the first pieces printed, which allowed us to make sure the link mounts were in the proper spots and also set wheelbase by sliding the parts on the frame rails.
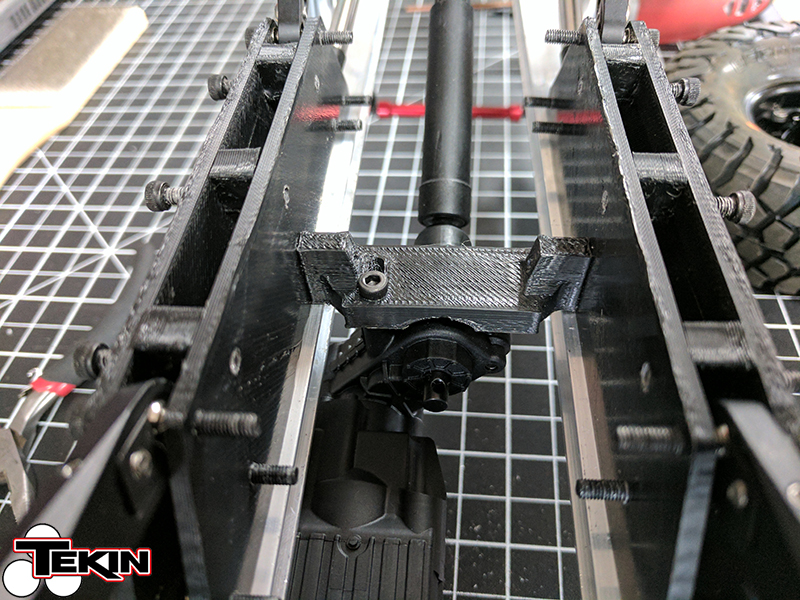
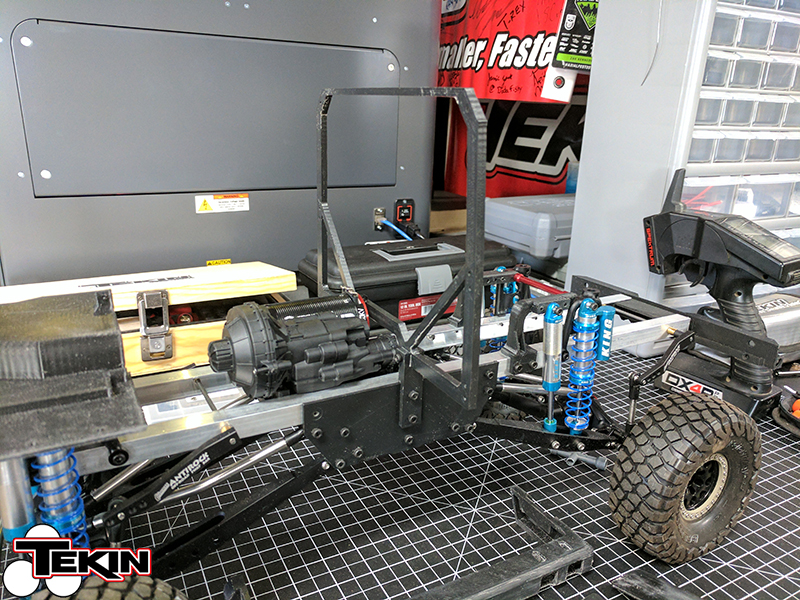
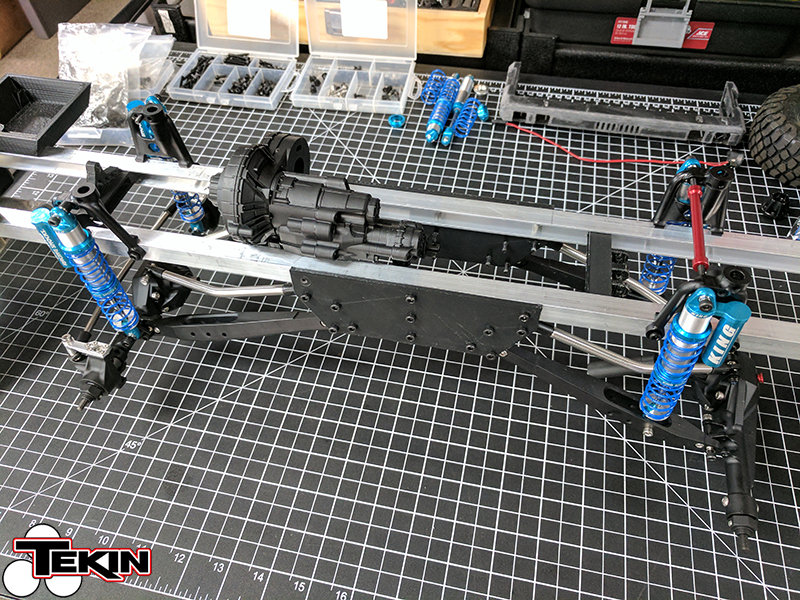 Once we got them positioned where they needed to go, we designed and printed new parts that would end up being bolted to the frame for good. The Axial SCX10-II transmission was mounted with some custom brackets that took a few revisions to get it lined up and sitting exactly where we wanted it. The transfer case outputs sit dead center in the chassis so we could get equal driveshaft lengths front and rear. Clean and simple so any maintenance wouldn’t be a daunting task in the future. Getting everything dialed in the center section of the truck sets the stage for the rest to come to fruition.
Eventually I’d like to print a different skid with a kick up on the front, but so far it hasn’t given us any issues.
Sway bars front and rear are mandatory on a truck this size. The weight and speed don’t play well with each other, so to combat body roll and keep the truck more level when cornering I installed Currie Anti-Rock sways from Vanquish. Measure thrice, drilleth once! The front sway was narrowed for tire clearance and to fit the only decent mounting location I was left with on the front axle. It’s not perfect, but it does the job and is 10000x better than no sway bar at all. This truck drives like a noodle with them unhooked. I tried it, no likey.
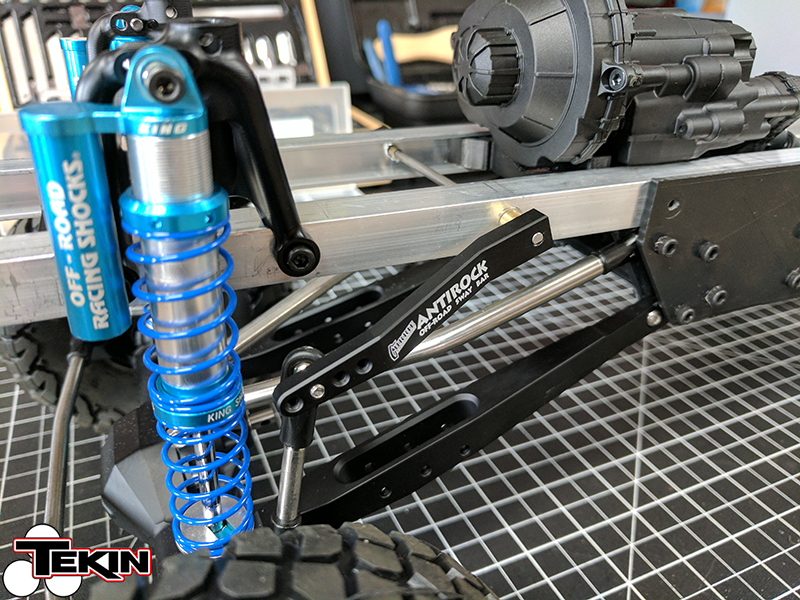
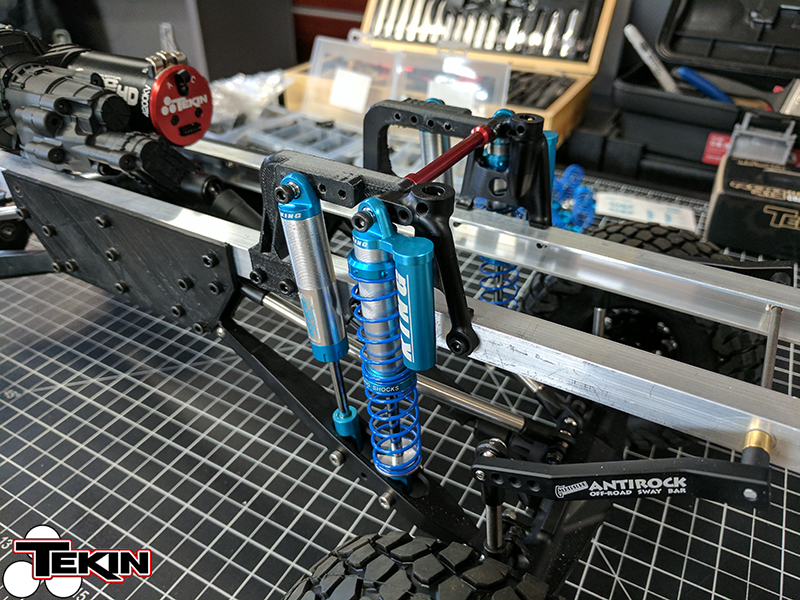 Single shock on each corner, no problem mon. We wanted dual though and that part took some creativity. A ton of measurements and a little guesswork later, we printed some mounts that didn’t fit and the shock angle was wrong. Changed the design, reprinted and ended up with a solution we though was good enough to get the shocks mounted how we liked. Front and rear are the same parts, again with that simplicity. Once these were mounted we had a chassis sitting on tires and it was a great milestone in the M-55 build.
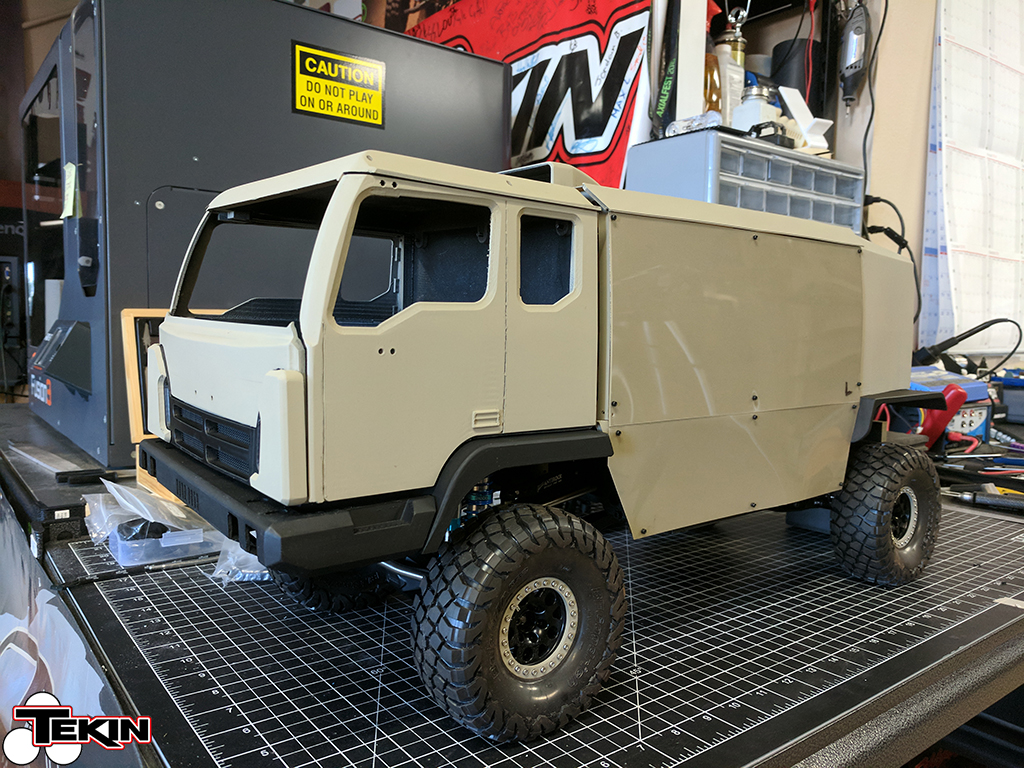
Chassis mostly completed, it was time to start on the fun part; making the concept come to life. It was many, many long print sessions on our Fusion3 F400-S. That printer ate over 300,000mm of filament creating this vehicle. That’s just about what a 1KG spool holds, which is like, 1/4 mile of 1.75mm ABS. The base of the cab was the first part printed and it is the same part from the 6×6 truck. Boring I know, it’s a part you can’t even see but it is what attaches the whole cab to the frame. The next part was the middle rib of the rear box section. The whole rear box is just a skeleton frame with polycarbonate panels attached to it. Simple, lightweight and flexible so impacts shouldn’t be much of an issue. I was the most excited about getting the cab done, it’s 5 big pieces that love to fail mid-print some times for literally any reason but we got lucky and of them printed out nicely. The bumper, grill and fenders took a lot of after print finish work with files, but we ended up with parts that almost look like they were injection molded. I’m still sick of sanding these parts and that was like 8 months ago.
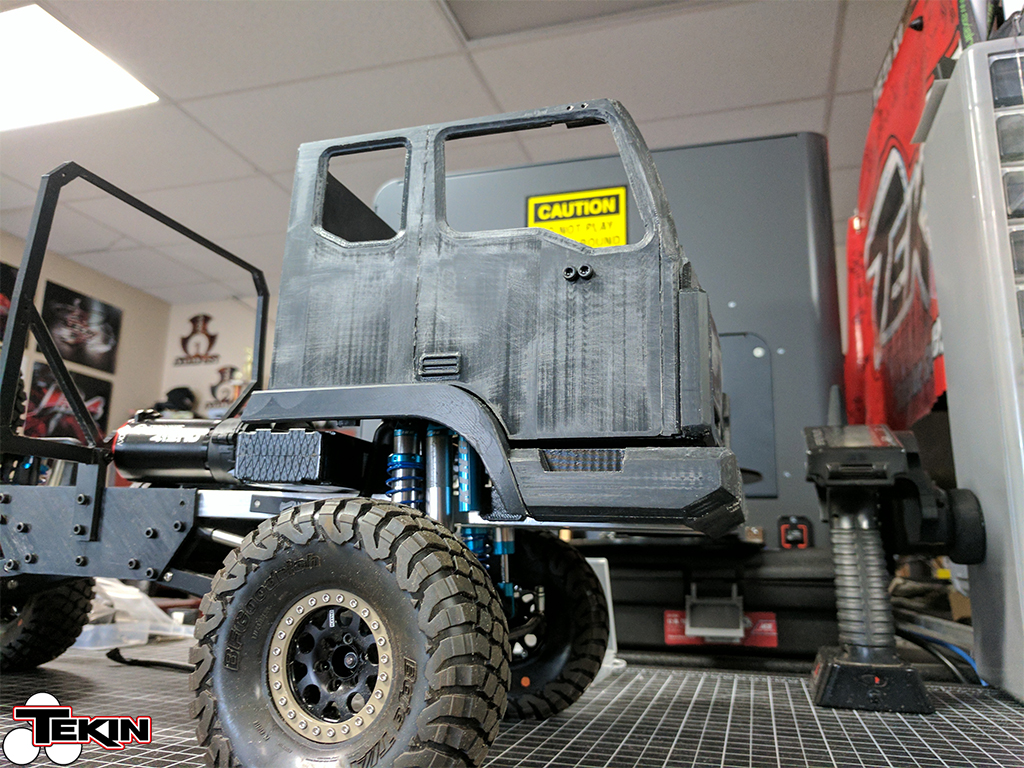
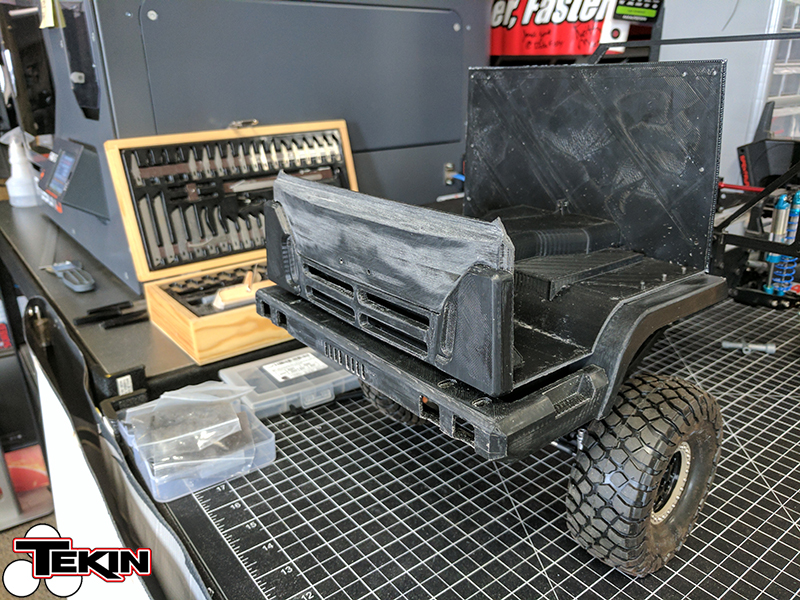
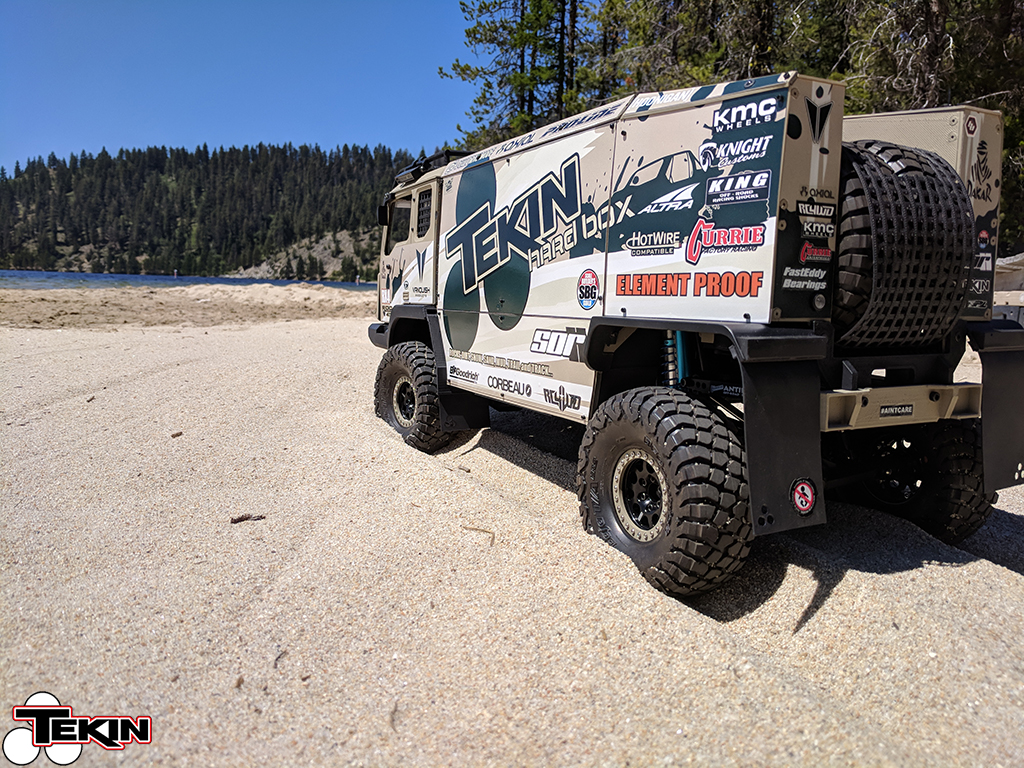
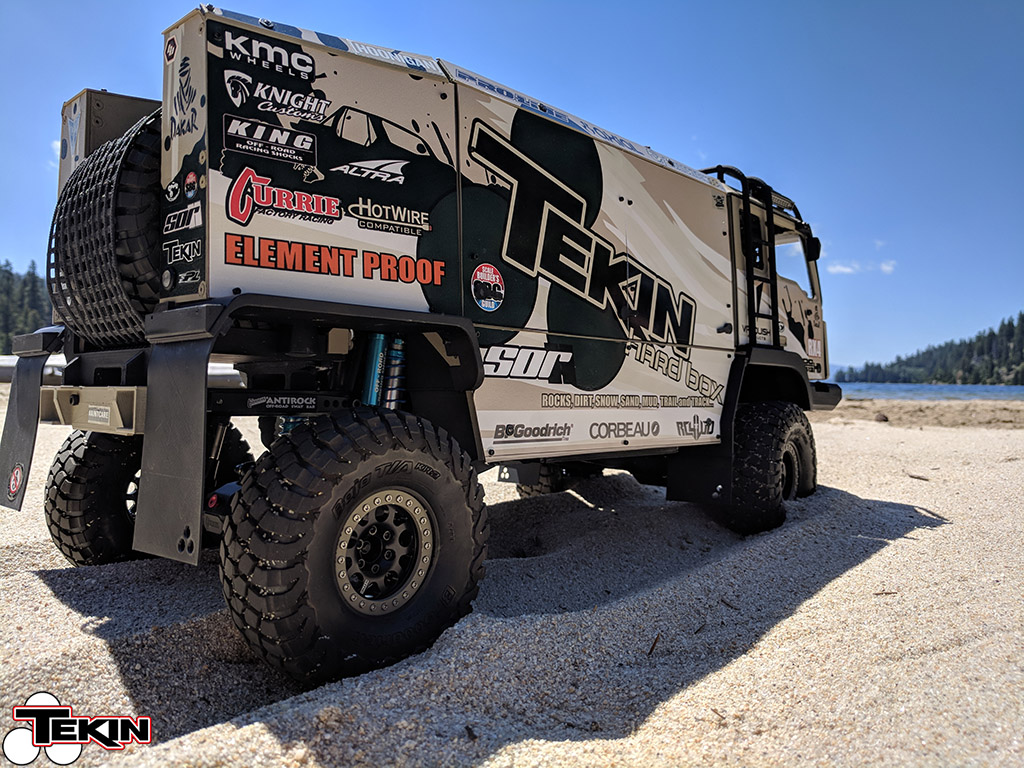
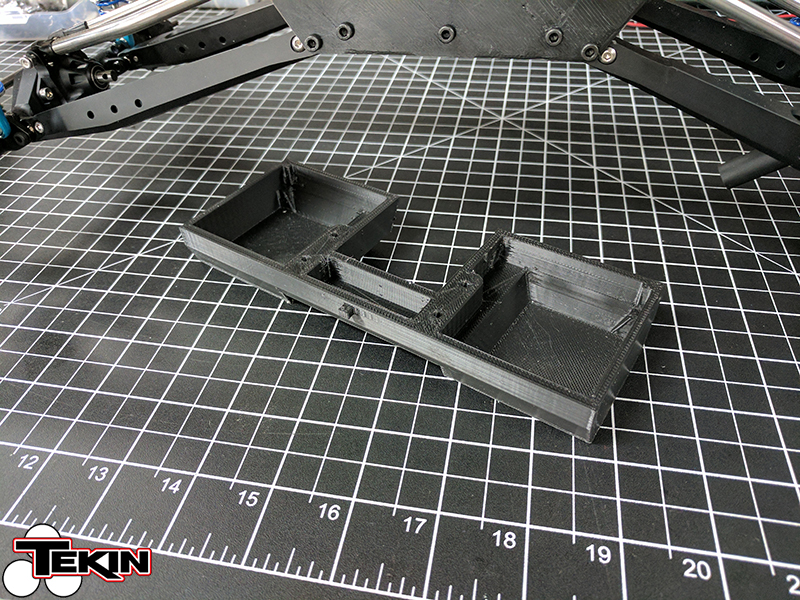
The first door came out great! Now let’s fast forward to all the pieces being printed, which was about 2 weeks later. The cab panels were all trimmed and sanded (ish, I got tired of sanding and it’s getting wrapped anyways) and the rear box section was completed with opening side hatches for access to the goods inside. I also needed to get to the batteries, which would be sitting one on either side of the frame in custom trays that put their weight down low. The lower sections of the box skeleton were printed out of Bridge material, which is nice and flexible just in case we ever hit anything solid with them. That big rear box cap piece was a total failure too by the way, so just pretend it isn’t there. It’s really starting to look like a race truck now!

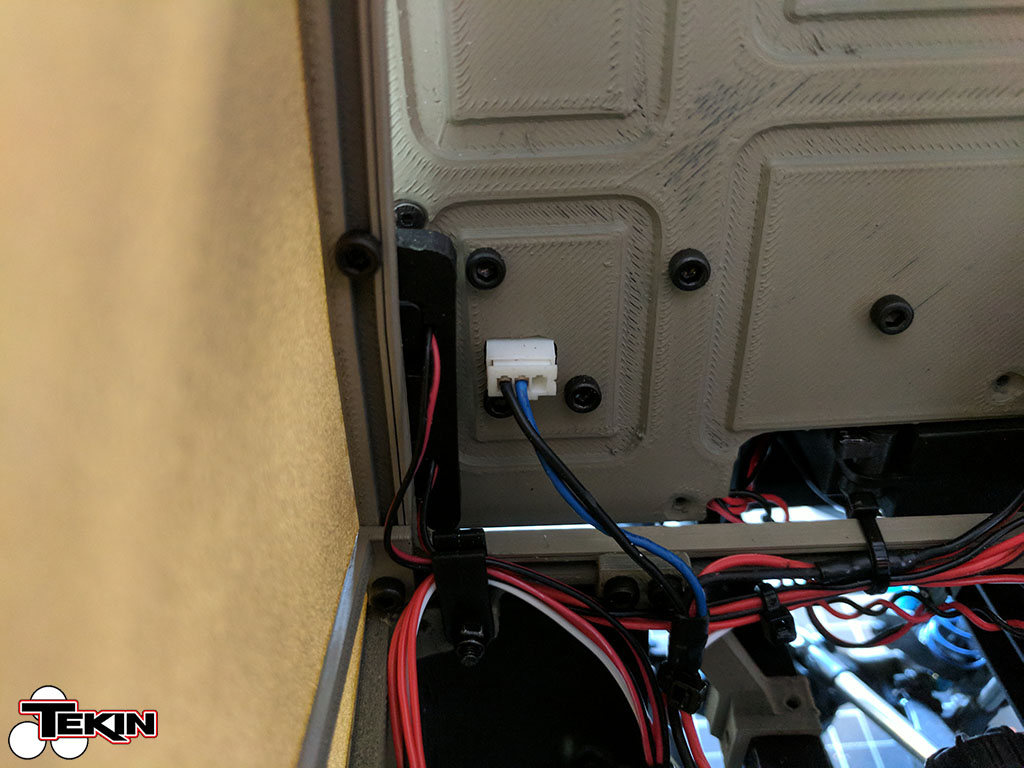
More sanding and some weeks later, the M-55 changed color. I stripped it completely down and painted the frame black with a satin clear coat. The panels for the box were cut and painted, the side hatches got latches that hold them shut and it was time to start on the wiring process, which took a lot more time than I was originally planning because I added a million lights that were never in the plans. It was all worth it though because she looks amazing all lit up at night!
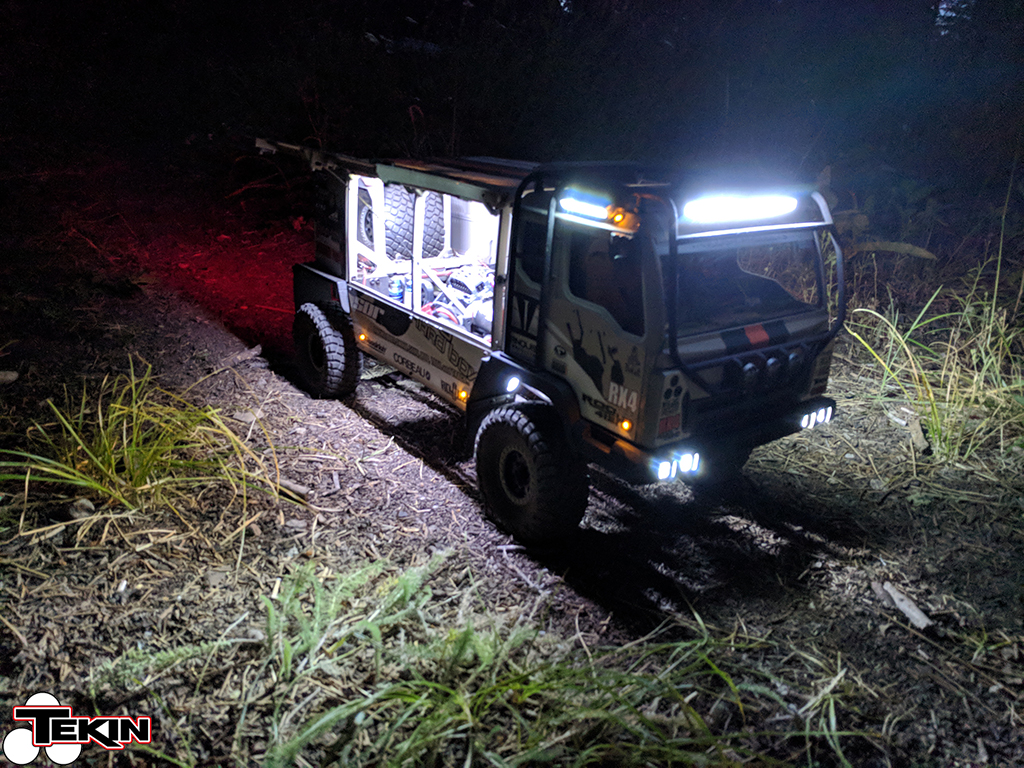
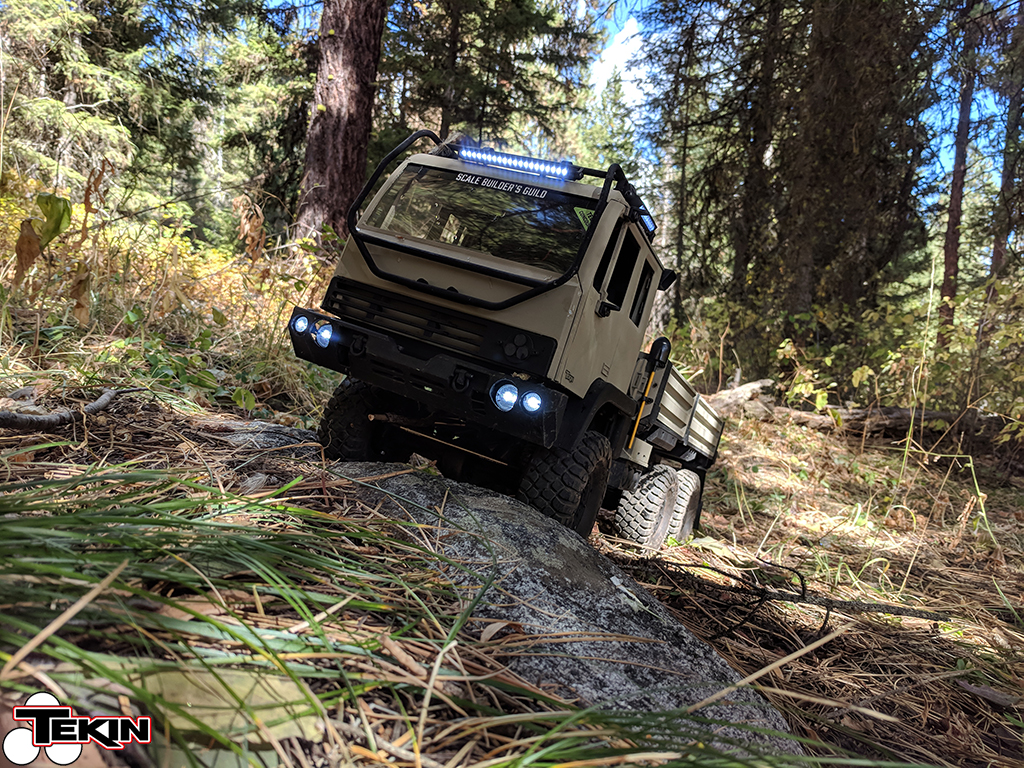
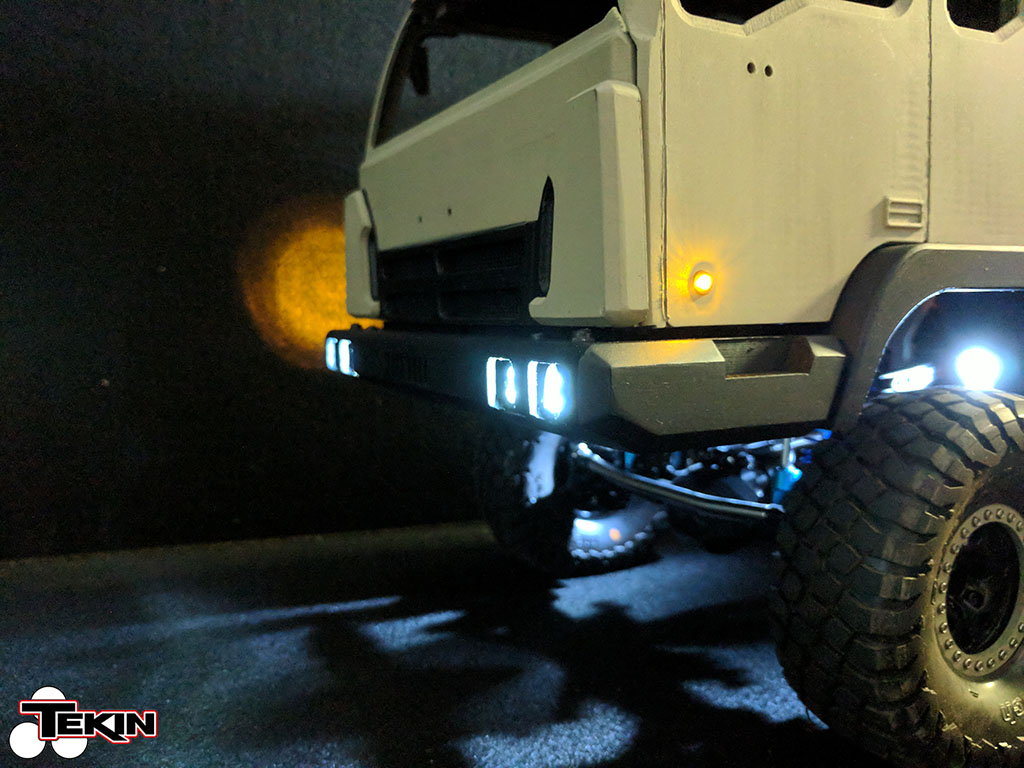
There’s tons of wiring in this truck. 3 separate LED controllers run the 14 amber marker lights, 2 tail lights, 4 rock lights, 2 interior LED strips and 4 Squadron pods and 3 Pro-Line light bars. Yeah, it’s a lot of lighting. The front rock lights are mounted in the mudflaps, which were printed out of Bridge for flexibility, the rear rock lights are mounted under the rear fender and are run off an Axial LED controller. The headlights are Baja Designs Squadrons running straight off 2S power. They are super bright! For even more light, there are 2 2″ Pro-Line LED bars off the sides of the cab for side lighting and one 6″ curved LED bar on the front, also all run on 2S power. All 3 LED bars are mounted on a custom designed roof rack setup that we had printed at Shapeways. The cab has a 2S power plug and a switch bank for the head lights and roof lights. The rear box interior lighting was done with 2 4″ LED strips that run off of 2S power and have their own switch.

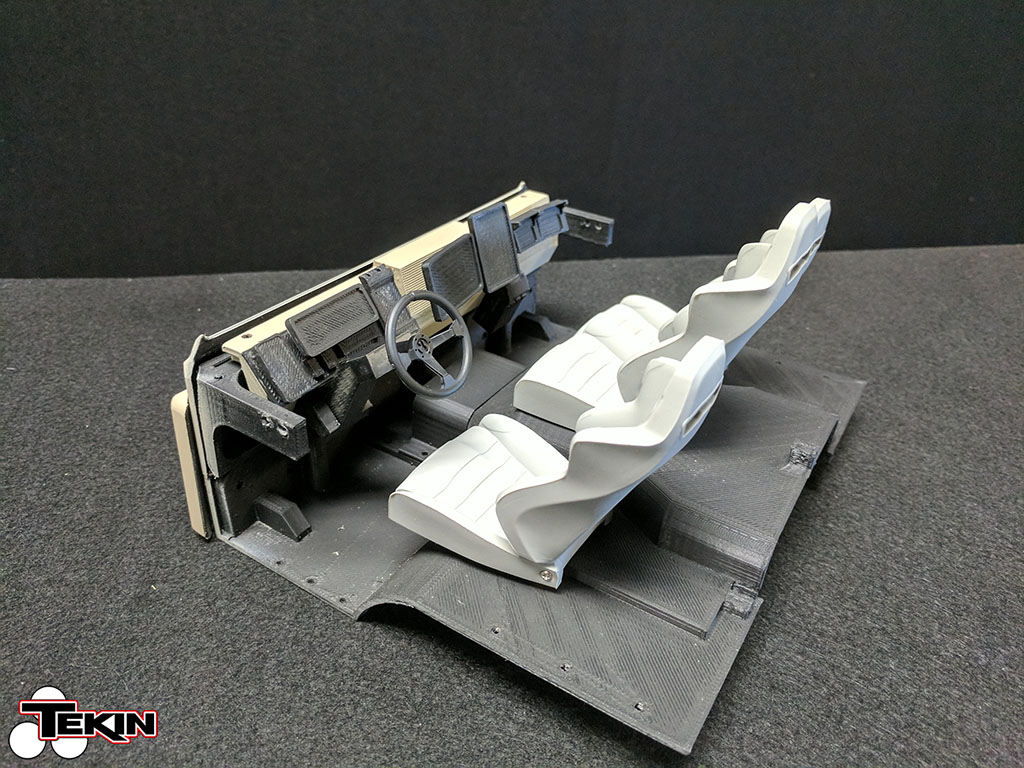
The interior for the cab came out pretty awesome too. We made a bunch of screens, mounted 3 Wraith seats and used a Deadbolt wheel. It was a lot of little parts to glue in and we finished it off with decals on every screen. The transmission tunnel area ended up being the perfect spot for our sound system speaker to hide.
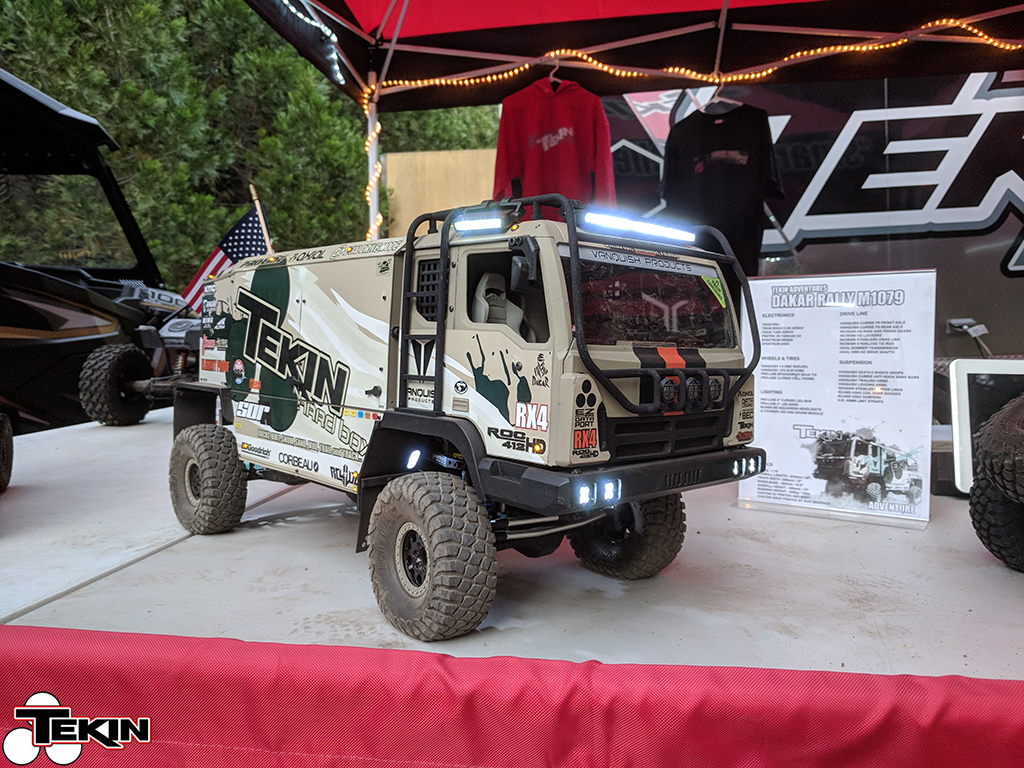
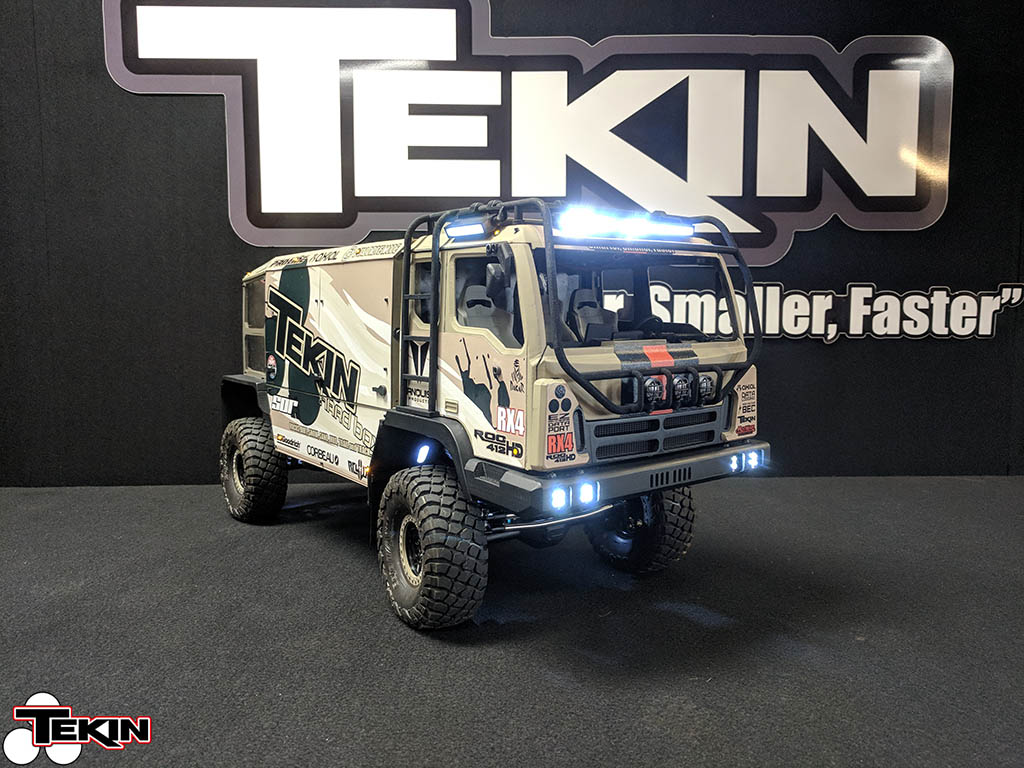 Wiring took me several days, several breaks and several choice words, but I got all the exterior lights working, interior lighting installed and the truck moved under its own power. The first time I drove it outside I had a smile a mile wide on my face. It soaked up the bumps like a trophy truck and looked like the real rally trucks of the Dakar and Silk Way rallies. It was hard to contain myself, but I brought it back inside before getting it too dirty because it was time to wrap it with the custom wrap printed by our friends at SOR Graphics with our custom design. I had to hand cut the pieces since there was no template for this truck other than the drawings used to design the wrap. We put die lines on it so I could cut them close and trim if necessary. It took me a few hours but I was happy with the end result!
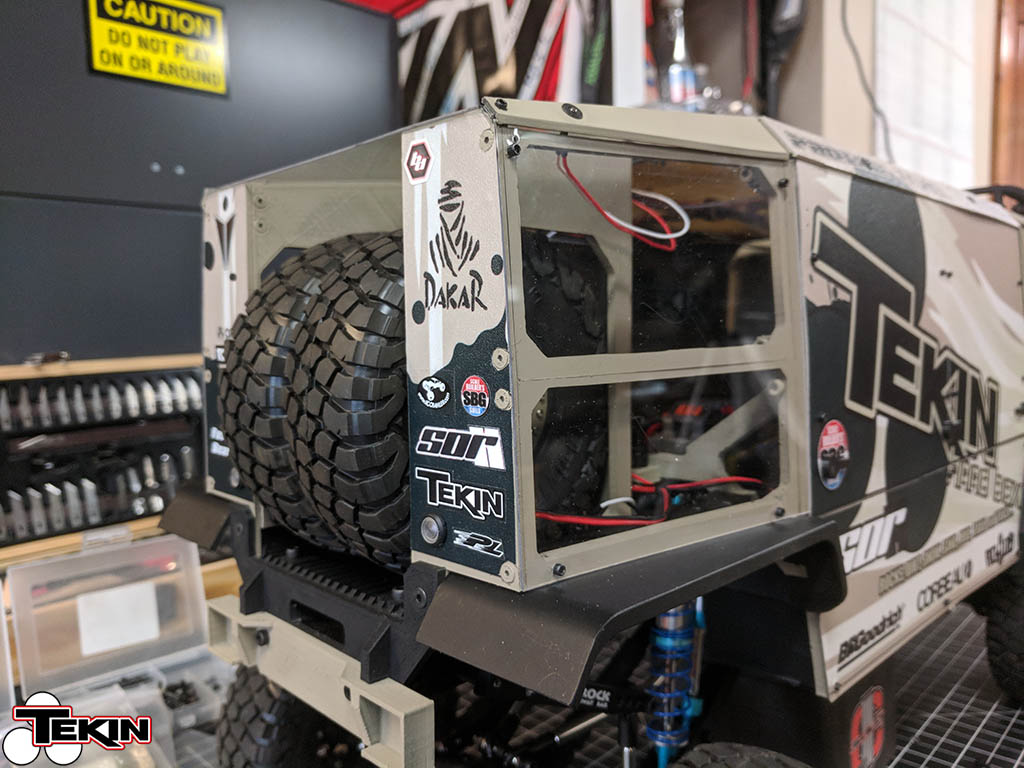 Check out the back of the box, we completely re-did that part. Two fully-functional spare tires are held in with a custom netting printed
from Bridge filament. I love that stuff, it is proving to be very versatile!

The whole project was immensely satisfying. We went from a pile of aftermarket parts for various other chassis, a few spools of filament and an idea to a fully functional 1:10 rally truck. Not only does it look better than we were ever expecting, it backs it up with performance. Rather than blab on and on about how it drives, check out the video!
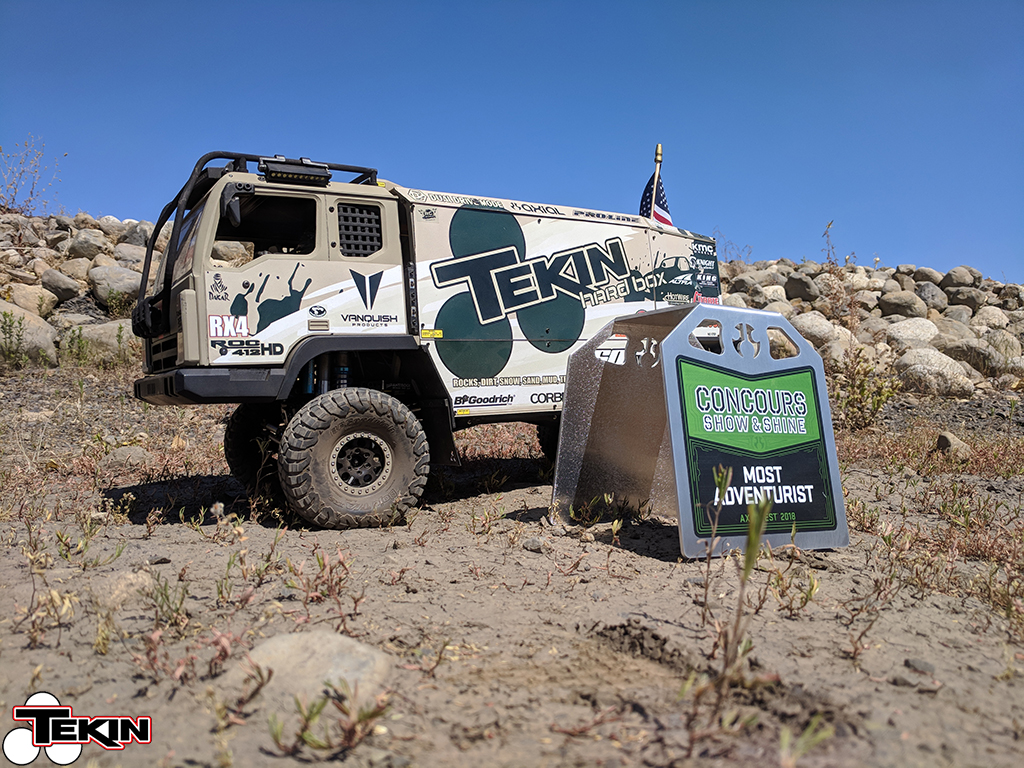
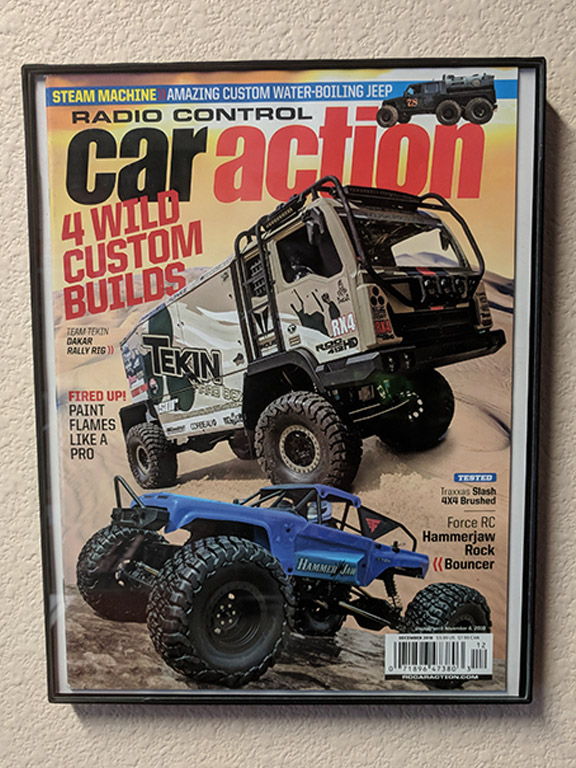
To top it all off, the M-55 made the cover of RC Car Action Magazine’s December 2018 Issue. A full feature highlighting the build process and Axialfest 2018 Concourse win in Most Adventurist awaits inside, make sure you give that a read too! I was so elated with the cover shot that it went straight into a frame and hung on the wall.
Huge thanks to our partners in this build!
Vanquish Products
Axial Racing
RC4WD
Pro-Line Racing
SOR Graphics
Altra Running
Canyon Coolers
Scale Builder’s Guild
RC Crawler
RECON G6
GALLERY